Working with Themes in React Native
You can style React Native apps using a theme. Common (theme) styles will greatly reduce the styling effort of individual apps. The following topics related to a theme are discussed in this article.
- How to create a theme
- Theme project structure
- Customizing a theme
- Compile a theme
- Update a theme
- Import a theme
- Multiple themes
Required Software
- Node (18.16.1)
- React Native Codegen: Run the below command in the terminal to install React Native Codegen.
npm install -g @wavemaker/rn-codegen
Creating a Theme
- Open a terminal
- Navigate to a directory where you wish to create a theme project
- Execute the following command
wm-rn-codegen theme generate ${theme-name}
- A new folder with the given theme name should get created.
- Open .wmproject.properties file.
- Provide value to name (required) and other metadata.
- Push the theme project to your VCS (optional).
Theme Project Structure
Following is the folder structure of a theme project.
$ThemeProjectsrcandroid- theme customizations specific to Androidios- theme customizations specific to iOScommon- theme customizations that are common to both Android and iOS
theme.png- a picture that represents this themewavemaker- This folder contains all the default styles provided by WaveMaker React Native Framework. The WaveMaker platform maintains the contents of this folder. Therefore, avoid any modifications in this folder..wmproject.properties- information about the theme
Customize Theme
To understand customization, let's take the button as an example.
- Go to
$ThemeProject/wavemaker - For each widget, there is a
lessfile inside thewavemakerfolder. Copybutton.lessfromwavemaker/components/basic/button.lesstosrc/common/components/basic/button.less
Path structure should be the same in both wavemaker and src/common folders. If you need customizations for a specific platform, copy the file into src/platform_name
- Open the copied file and change or add styles
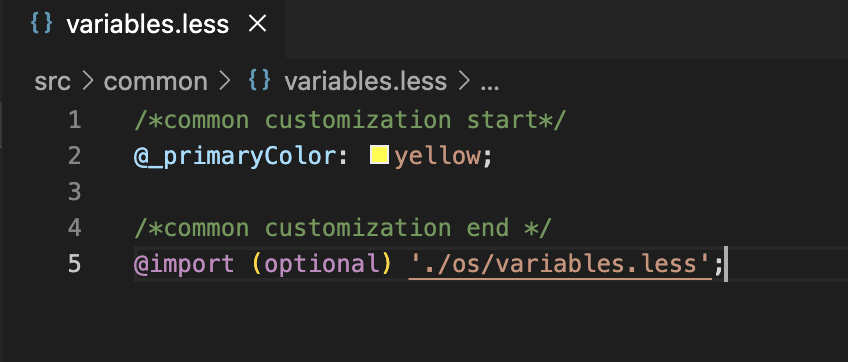
Customizing theme colors
- Open
wavemaker/variables.less - Select the color that requires change.
- Open
src/common/variables.less. For a platform-specific change, open correspondingvariables.lessof that platform folder. - If
@platformColorhas to be changed, add a less variable with the name@_platformColorand assign the desired value. The new variable name must have an underscore between @ and variable name. For example,@_primaryColorwill override the value of @primaryColor.
Compile Theme
- Open a terminal
- Navigate to the directory where the theme project is.
- Execute the following command.
wm-rn-codegen theme compile
- Under the dist folder, the theme.zip file should get created after successful compilation.
Update Theme Project
- Open a terminal
- Navigate to the directory where the theme project is.
- Execute the following command.
wm-rn-codegen theme update
- Theme project: contents of the
wavemakerfolder migrates.
When @wavemaker/rn-codegen is updated, run theme update on the existing theme projects.
Import Theme into a Project
- You can import the zip generated in the compiled step into a React Native project. For more information, see import and apply a theme.
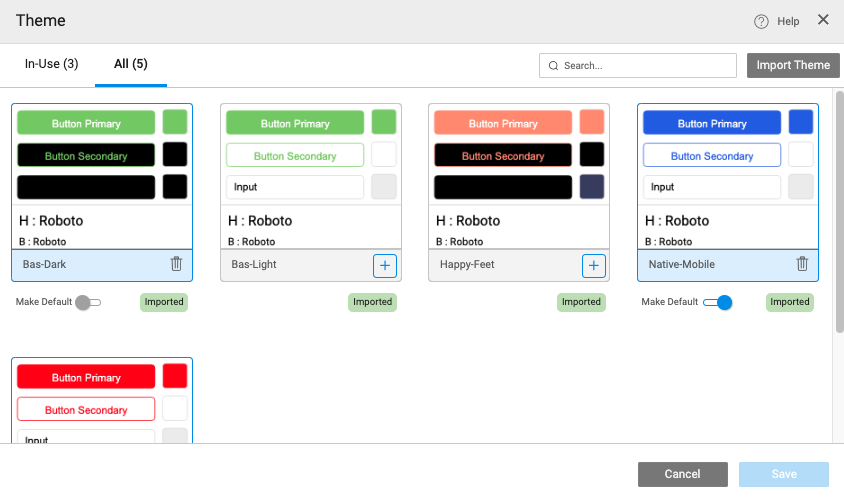
Multi-theme Support
With Multi-theme support, you can choose multiple themes at the same time for an application using the Theme dialog, setting one theme as the default.
How to Apply Multiple Themes
- In WaveMaker Studio after importing themes using the Theme dialog.
- Select multiple themes from the themes available in the Themes window to be part of the application.
Get Theme Information
- To know the names of the themes available in an application, use
App.themes. - To check the name of the active theme in an application, use
App.activeTheme. - For example, use the below code to construct a Select UI using the above values
Markup
<wm-select name="select1"
    dataset="bind:App.themes" datafield="All Fields"
    datavalue="bind:App.activeTheme"
    on-change="select1Change($event, widget, newVal, oldVal)">
</wm-select>
Script
Page.select1Change = function($event, widget, newVal, oldVal) {
    App.activeTheme = newVal;
};